Tuesday, April 27, 2010

The Knot Prayer

I was at a friends house this weekend and saw this prayer posted on her fridge. I'm not one for posting these kinds of things but it really got me thinking about how much I've let little thoughts hold me back from being who I want to be and doing what I want to do. So, I thought that I'd share since I know I'm not the only one that needs a little nudge.


The Knot Prayer

Dear God
Please untie the knots that are in my mind, my heart and my life.
Remove the have nots, the can nots and the do nots that I have in my mind.
Erase the will nots, may nots, might nots that may find a home in my heart.
Release me from the could nots, would nots, and should nots that obstruct my life.
And most of all, Dear God, I ask that you remove from my mind, my heart, and my life
all of the "am nots" that I have allowed to hold me back.
Amen

Friday, April 23, 2010

Looking for...inspiration

I was so hoping that the nicer weather would inspire me to create some new stuff again, but I just haven't been motivated. I feel like a need a week off of work to just get my home organized and cleaned and maybe then I'll feel comfortable here again and feel like creating.

My ex-hub did bring me a wonderful gift - his trash from work. I'm not complaining. He brought me a nice pile of scraps of Mylar that would've gone in the trash anyway. I always think it would be nice to make those really cool contemporary hanging lamps with the scraps or something, but normally it just gets piled away. One day though, I think I will do a reverse painted lamp covering or something with it but for now it gets used for collaging or journalling. I did start on a journal page with some of the Mylar, but didn't feel like finishing, so no pic today, but I got a pic of 2 new paintings.

Image and video hosting by TinyPic

I think I'm rather fond of this painting even though it's very dark.

Image and video hosting by TinyPic

And this one is dedicated to my favorite coffee shop. One of the owners has an obsession with cupcakes. Just don't know what that's all about. This was taken before it was done. I'll have to take a pic of the completed one and post later.

Tuesday, April 13, 2010

Lucky Girl

Image and video hosting by TinyPic

Simple Woman's Daybook


For Today...

Outside my window...
a clear cool night. I can see the stars.

I am thinking...
of reorganizing and decluttering my home

I am thankful for...
kids that don't argue when it's time for bed and getting some "me" time.

I am creating...
new page for my art journal, maybe I'll share

I am hearing...
too many thoughts running through my mind and I just can't shut down for bed

I am remembering...
when things were easier, being young and free


I am going...
to bed soon and hopefully actually sleep

I am currently reading...
no time for reading, would rather play

I am hoping...
for a less hectic day tomorrow at work.


On my mind...
everything and nothing that's important

Noticing that...
all my paintings lately have been so dark, yet I feel so happy.

Pondering...
the person I'm becoming. In just 6 months, I've changed so much, at an age that I thought I knew me. I like who I am becoming, though.

Around the house...
a big mess.

One of my favorite things...
painting

My picture thought...
my latest painting, thought I'd share.
Image and video hosting by TinyPic

Sunday, April 11, 2010

Skins

Had to share this new technique I found for transferring images with gel medium. I was at the bookstore Saturday and found the book Image Transfer Workshop by Darlene Olivia McElroy. In it, she shows you how to create an image skin from a Yupo painting. So, off to Jerry's for some Yupo and misc. items. I actually had an image at home that I had planned on cutting up and using in a journal, so I decided to just use that. In my lack of thinking and my excitement about trying something new, I didn't realize that the image was on Mylar and not Yupo - but it worked anyway. Before we get started, let me just explain - I suck at following instructions. I just don't listen and I hate reading them. I don't know if I just think that I'm too smart for it or it is just me getting overexcited and just wanting things to hurry up and get done, but my enthusiasm usually wins out and poor results ensue. So just remember do as I say and not as I do.
Here's what you need:
Yupo, Mylar (or I'm guessing any sort of synthetic paper will work that will hold a waterbased image well)
Soft gel medium
Spray workable fixative
watercolor or acrylics (including inks)
Create your image on the paper you are using and let dry. Once it's dry, spray on a layer of workable fixative and make sure it thoroughly covers the image. Allow the fixative to dry completely before laying a thick layer of gel medium. Don't be stingy because once the gel medium is dry, you will need to peel it off the paper. If you aren't generous with it, when you peel it, it will stretch or break easily. Also, you want to make sure the gel is completely dry - you'll know it's there when it is clear. A small word of caution, it tends to stick to itself so be careful while pulling it off.


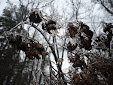
Here's the results of my impatient skin.

I haven't decided how I will layer this into my journal, but I think I will probably create more skins from the painting that I have and actually follow my instructions for once.

Monday, April 5, 2010

Creating Journal Backgrounds

I am moving this post over from my other blog, Altered Spirit. I've put that blog on hold anyway and have all my art stuff here, so why not share here. I'm actually contemplating making that blog more of a personal journal, which will mean making it private, at least for now. I had the pleasure of attending an acrylic inks demo at Jerry's Artarama, lead by Ophelia Staton, and I showed this technique. I'm sure I read or saw this somewhere, but unfortunately cannot give proper credit since I can't remember where, but I still want to share. I have seen this taught in several books and on websites, but it consist of using baby wipes to transfer color to paper for a watercolor look. It calls for using inks or watercolor liquids, but I had neither, so my tutorial will be with using acrylic paint.
So, gather your supplies:
  • paints. Just two or three colors. Any more than that and they'll end up too muddied
  • container with water
  • spray bottle with water in it.
  • a few baby wipes. Any brand will do.
  • disposable plate for paint
  • paint brush
  • paper, heavyweight. I used 90lb, but next time will probably get something heavier.

Place a few dollops of paint on your plate. Once again I lacked the foresight and just used a grocery bag to set my paint on, so if you don't already have plastic plates sitting around, by all means, use what you've got - no need to add expenses. Dipping your brush in the water container, pick up water to mix in with your acrylics and begin spreading around your plate without mixing them together. Place the baby wipe neatly and completely spread open on top of the paint. Tap the wipe into the paint. While the wipe is still on the paint, take the spray bottle and saturate the wipe with more water. You want it pretty soaked but not super drippy. Pick up the wipe gently and spread it onto your paper. Take a clean wipe and use it to dab on top of the wipe to evenly cover the paper below it. Continue picking up the wipe gentle and moving it around on your paper until it is completely covered in paint or covered how you desire. Don't get concerned while you are dabbing that the paint on the wipe is getting muddled. Once you remove it from your paper, you will see that it is not muddled. I managed to do 2 sheets with just one wipe and 3 colors, without the colors looking bad. Added bonus, when I was getting ready to clean my mess up, I had a bowl full of nasty looking water. I decided to take that water and use it on a sheet that I had gessoed a few days before and just painted the sheet with the water. Turned out pretty nice if I say so myself. The papers are way prettier in person that in the pictures. I will have to post once I've actually put them into a book and done something with them

Lay colored wipe on paper and dab with another wipe

End result, first paper.

Using leftover water for journal page

Second journal page

Related Posts with Thumbnails